
I'm in the process of making my own chest box for my ANH Vader (along with the rest of the costume). There was a slight mishap on the chest box while routing out the back of it -- the bit dropped (almost falling completely out while it was on) and it plunged through the box. I'll have to fill that with bondo, but it's no big deal. The rocker switches were made out of a pine 2X4, and those too will need some bondo work, as I cut them on the scroll saw, and they have a few defects that need to be fixed. Original Micro Switch covers, and I'll paint one of them red (to get just one actual red cover just isn't cost effective & the guys on the RPF are selling them way too high (it should only be around $20 for one with shipping -- I paid $20 for both green ones)). The coin slots and chest rods are from RussRep.
*photos edited out: see last post for pics
Vader ANH progress thread
Moderator: Garrison Officers
-
Arcturus1020

- MWG Member

- Posts: 2621
- 4poziom.waw.pl
- Joined: Wed Nov 17, 2004 1:39 pm
- 501st Legion ID: 1020
- Real Name: James Tampa
- Location: Aurora, IL
- Contact:
Vader ANH progress thread
Last edited by Arcturus1020 on Fri Dec 28, 2007 10:49 pm, edited 1 time in total.
-
Acrylikhan

- Imperial Soldier

- Posts: 442
- Joined: Fri May 26, 2006 7:21 pm
- Location: Chicago, IL
- Contact:

You guys are trully tallented all around.
great job Jim!!
great job Jim!!
my photo gallery
http://www.flickr.com/photos/arturoseeker/collections/
http://www.flickr.com/photos/arturoseeker/collections/


-
Arcturus1020
- MWG Member
- Posts: 2621
- Joined: Wed Nov 17, 2004 1:39 pm
- 501st Legion ID: 1020
- Real Name: James Tampa
- Location: Aurora, IL
- Contact:
-
dad vader

- MWG Member
- Posts: 1762
- Joined: Wed Dec 29, 2004 6:26 pm
- 501st Legion ID: 1781
- Location: Valparaiso In
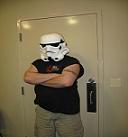
The helmet is a mystery off eBay
In all of my hours or research I have done,it looks to be a recast of the Fiberdyne line,(or "Jeff" helmet) the "latch" mechanism on the forhead gives that away...
The Fiberdyne is supposed to have lineage to the original ANH helmet...but I won't put money on that...There are many different storys about where it came from...None have really been proven to my satisfaction...
BTW,It looks great Jim...I'm sure you will do it justice!!!
-
Arcturus1020
- MWG Member
- Posts: 2621
- Joined: Wed Nov 17, 2004 1:39 pm
- 501st Legion ID: 1020
- Real Name: James Tampa
- Location: Aurora, IL
- Contact:
-
Arcturus1020
- MWG Member
- Posts: 2621
- Joined: Wed Nov 17, 2004 1:39 pm
- 501st Legion ID: 1020
- Real Name: James Tampa
- Location: Aurora, IL
- Contact:
I picked up some bondo last weekend, and started refining the box. The back of the box has been filled, and sanded down; I now have a little more to do in the back, but that's only because I'm a perfectionist. I also started to build up the front where I took too much material away and sand that down. There's still more bondo work to be done, and I have to fill in a little bit of the coin slot areas, because they're a bit too high. The depth is good, and the width is pretty spot on.
****
I still have yet to work on the rocker switches. That'll be this weekend.
Have a happy and safe Halloween everyone!
*photos edited out: see last post for pics
****
I still have yet to work on the rocker switches. That'll be this weekend.
Have a happy and safe Halloween everyone!
*photos edited out: see last post for pics
Last edited by Arcturus1020 on Fri Dec 28, 2007 10:50 pm, edited 1 time in total.
-
Acrylikhan
- Imperial Soldier
- Posts: 442
- Joined: Fri May 26, 2006 7:21 pm
- Location: Chicago, IL
- Contact:
-
Arcturus1020
- MWG Member
- Posts: 2621
- Joined: Wed Nov 17, 2004 1:39 pm
- 501st Legion ID: 1020
- Real Name: James Tampa
- Location: Aurora, IL
- Contact:
More progress! I have the first two coats of primer on . . . now to do a few minor patches, sand, prime, sand, and apply the black coats! It's coming right along now!!!
*photos edited out: see last post for pics
*photos edited out: see last post for pics
Last edited by Arcturus1020 on Fri Dec 28, 2007 10:50 pm, edited 1 time in total.
-
Darth Gloat
- Inactive Member
- Posts: 2568
- Joined: Wed Nov 17, 2004 10:17 pm
-
Arcturus1020
- MWG Member
- Posts: 2621
- Joined: Wed Nov 17, 2004 1:39 pm
- 501st Legion ID: 1020
- Real Name: James Tampa
- Location: Aurora, IL
- Contact:
It's getting there, Darth Gloat. . . . First coat of black has been sprayed.
*photos edited out: see last post for pics
*photos edited out: see last post for pics
Last edited by Arcturus1020 on Fri Dec 28, 2007 10:51 pm, edited 1 time in total.
-
Darth Gloat
- Inactive Member
- Posts: 2568
- Joined: Wed Nov 17, 2004 10:17 pm


-
Arcturus1020
- MWG Member
- Posts: 2621
- Joined: Wed Nov 17, 2004 1:39 pm
- 501st Legion ID: 1020
- Real Name: James Tampa
- Location: Aurora, IL
- Contact:
After wet sanding the base black with a 1500 grit paper, I applied the next coat. It came out really well
And now to work on those rocker switches . . . although, I may just cast this one so they're all exactly the same. The other rocker switches I made all have a lot of bondo work to be done to them still. . . . *sigh*
Overall, I'm really proud of this piece (can 'ya tell?!?).
*photos edited out: see last post for pics
Last edited by Arcturus1020 on Fri Dec 28, 2007 10:51 pm, edited 2 times in total.
-
arccommander
- 501st Member

- Posts: 124
- Joined: Wed Jun 13, 2007 11:32 pm
- Location: Allen Park, Mi 48101
I'm also impressed on your photographic abilities.
my photo gallery
http://www.flickr.com/photos/arturoseeker/collections/
http://www.flickr.com/photos/arturoseeker/collections/
-
Acrylikhan
- Imperial Soldier
- Posts: 442
- Joined: Fri May 26, 2006 7:21 pm
- Location: Chicago, IL
- Contact:
-
Arcturus1020
- MWG Member
- Posts: 2621
- Joined: Wed Nov 17, 2004 1:39 pm
- 501st Legion ID: 1020
- Real Name: James Tampa
- Location: Aurora, IL
- Contact:
A progression montage of the chest box (please click on the photo for a larger image).
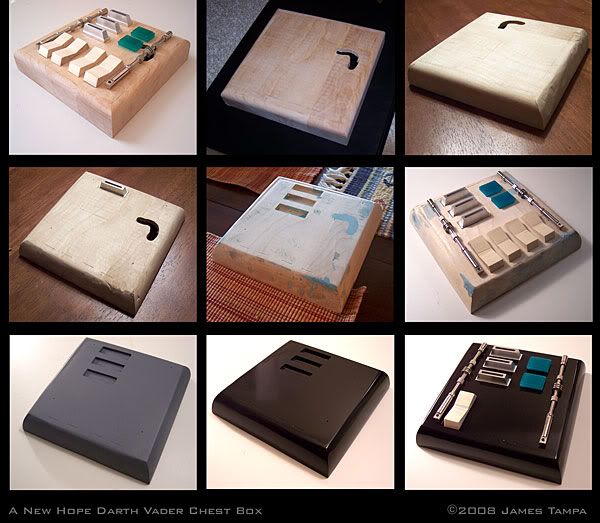
1. Starting with a piece of scrap solid maple stair tread, the chest box soon took form with a table saw, router, and measurements from an individual who is in possession of a screen-used ANH chest box copy and kindly provided me with that info.
2. Here it's shown without the added parts. As you can see, I transferred the layout illustration that I created prior to starting this (here) onto the block of wood. A portion of the back was removed with a router bit; unfortunately, the bit dropped while operating the router back and forth, and it cut through the front of the box.
3. After consulting with the same Dude about the corner angles, I sketched out the correct round-over and began to chisel away the excess material.
4. At this stage, I began work on counter sinking the coin slots (again, with the chisel). I have also chiseled in 4 small slots toward the bottom to act as a guide when placing on the rocker switches. Pilot holes have also been punched in using a small screwdriver (thank you Dr. Who).
5. Having never worked with a chisel before, I found myself in need of wood filler. Deciding that your average wood filler just wouldn't do for this project (IMO, it's just too soft and brittle - even when dry), I opted for auto body filler and purchased (on the recommendation by TK412) the NAPA exclusive Micro Lite Light Weight Body Filler (#6370). I also decided to chisel in a small groove along the top and left edge to simulate a built-up frame.
6. With all the pieces in place, I take another photo to see any detail that may have escaped my eye before I prime it. Alas! Some areas I neglected to sand, and other areas which still needed additional bondo work.
7. After hitting it with the initial primer, I decided that the groove I created in photo 5 was a bit too defined, so I added a little more bondo here and sanded it smooth. Two more coats of primer were added afterwards with sanding in between all coats.
8. Having applied the last primer coat, I sanded it down with a 1000 grit paper. After cleaning the residue off, I hit it with a coat of black. I'm using Rustoleum Painter's Touch spray paint for all of this. This coat was left to dry for 24 hours.
9. After the first coat of black dried, I wet sanded it with a 1500 grit paper, then cleaned the box off, and sprayed another coat on. It looks like a mirror finish at this stage when dry. I place some of the parts on to see how it'll look at this point.
The final image(s) to come in the next year!