
Biker Scout Armor Project WARNING: picture heavy
Moderator: Garrison Officers
-
Arcturus1020
- MWG Member

- Posts: 2618
- 4poziom.waw.pl
- Joined: Wed Nov 17, 2004 1:39 pm
- 501st Legion ID: 1020
- Real Name: James Tampa
- Location: Aurora, IL
- Contact:
Incredible work.  ... I've been watching this thread since you started and just reviewed all the pages again and am still amazed at the attention to detail you've put into this. I'm ashamed I havn't commented sooner
  .
.
With my limited prop building skills, the only comment / advice I can offer other than PHENOMINAL... is reference to the locked on knee pulls. I'd suggest making a detatched "ramp" buffer for the bottom part of the knee. A wooden wedge similar to the top section of the knee that rests against the lower section of the buck and can be removed after the pull. Drill a pilot hole in the bottom of the "ramp" so that after the pull, you can flip everything upside down, insert a drywall screw 3/4 in and use it to pull the wedge out. The void created should give enough room to pop out the knee buck w/o having to score or crack the plastic .
.
Keep up the great work.
With my limited prop building skills, the only comment / advice I can offer other than PHENOMINAL... is reference to the locked on knee pulls. I'd suggest making a detatched "ramp" buffer for the bottom part of the knee. A wooden wedge similar to the top section of the knee that rests against the lower section of the buck and can be removed after the pull. Drill a pilot hole in the bottom of the "ramp" so that after the pull, you can flip everything upside down, insert a drywall screw 3/4 in and use it to pull the wedge out. The void created should give enough room to pop out the knee buck w/o having to score or crack the plastic
Keep up the great work.
-
Acrylikhan
- Imperial Soldier

- Posts: 442
- Joined: Fri May 26, 2006 7:21 pm
- Location: Chicago, IL
- Contact:
Thanks man! I'm still fairly new to vacuforming. But even I was amazed how well it locked onto the part. I do have a couple more knees to cast, so I will add removable ramps to help separate the part, as you've suggested. Anything to make it easier.
Thankfully, where breaks occurred, those areas will be trimmed off.
I'm glad you're enjoying the show! More crazy casting is still yet to come!
Thankfully, where breaks occurred, those areas will be trimmed off.
I'm glad you're enjoying the show! More crazy casting is still yet to come!
Retired from Star Wars Costuming - then again retirement is overrated
-
Acrylikhan
- Imperial Soldier
- Posts: 442
- Joined: Fri May 26, 2006 7:21 pm
- Location: Chicago, IL
- Contact:
A little more work needs to be done. I got the pieces trimmed, and started the process of putting in the slots for the one - inch straps.
I cut the sections, and then carefully bent the tongue of plastic inward to make the channel. I re-bonded it in place with a styrene/bondo cement rooster, and then backed it with a little more for strength. I have to do a little finishing on the sides. I got a little carried away with the dremel and the file. Most of the damage will be hidden by the strap, so this is more cosmetic work for my own idiom.

(yeah, one is slightly larger on the bottom. It's supposed to be like that due to my alien genetic makeup.)


Tomorrow, I'm finishing up the cosmetic work, and the painting them with good ol' Fusion white!
Lessons learned:
I will be improving the buck for the knee armor. That is an immediate given. The MDF is great, but I because I'm able to pull roughly 28-inches of Mercury on the vacuum pump at work, some of the extremely minor impeefections are showing in the castings. No biggie because the parts are being painted. On the to do list I will add the strap channels, and smooth out all the rough edges. Also I think I've got the right shape the knee is supposed to be in. I will add walls where the parting like will be.
All in all, this was a tricky part part to sculpt. But the results are fantastic!
I cut the sections, and then carefully bent the tongue of plastic inward to make the channel. I re-bonded it in place with a styrene/bondo cement rooster, and then backed it with a little more for strength. I have to do a little finishing on the sides. I got a little carried away with the dremel and the file. Most of the damage will be hidden by the strap, so this is more cosmetic work for my own idiom.
(yeah, one is slightly larger on the bottom. It's supposed to be like that due to my alien genetic makeup.)
Tomorrow, I'm finishing up the cosmetic work, and the painting them with good ol' Fusion white!
Lessons learned:
I will be improving the buck for the knee armor. That is an immediate given. The MDF is great, but I because I'm able to pull roughly 28-inches of Mercury on the vacuum pump at work, some of the extremely minor impeefections are showing in the castings. No biggie because the parts are being painted. On the to do list I will add the strap channels, and smooth out all the rough edges. Also I think I've got the right shape the knee is supposed to be in. I will add walls where the parting like will be.
All in all, this was a tricky part part to sculpt. But the results are fantastic!
Retired from Star Wars Costuming - then again retirement is overrated
-
Acrylikhan
- Imperial Soldier
- Posts: 442
- Joined: Fri May 26, 2006 7:21 pm
- Location: Chicago, IL
- Contact:


-
Acrylikhan
- Imperial Soldier
- Posts: 442
- Joined: Fri May 26, 2006 7:21 pm
- Location: Chicago, IL
- Contact:
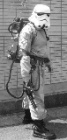
I was getting reference photos of myself this weekend to start cyphering the torso armor. I'm starting getting an idea of where the shoulder bells are, and see how everything should look. I also wanted to make sure that I will have overlap on the cummerbund too.
I did find a few problems that need to be fixed:
1. I need a balacava that has better coverage for a longer neck. I didn't realize how much of a giraffe I have until I saw the photos. My wife was helping me out but still there's skin showing.
2. The collar has to be extended up to compensate for my neck, and a velcro sealing flap need to be installed. I will have to figure something to hide the zipper too. Giraffe neck syndrome. Any ideas to help out on this would be appreciated!!
3. I need to put elastic straps on the cuffs of the wrists to keep the sleeves from crawling out from my gloves.
4. Elastic straps on the pant cuffs wouldn't hurt either. They too tend to crawl out of my boots.
5. I have to remove some of the exterior pockets. I wanted to keep them some of them to keep my wallet and keys on my person, but the ones that show will be removed. The chest pockets I'm keeping because they will be hidden.
6. The waist area of the flightsuit is a little too baggy. Either I will have it sewn in, or add more velcro so that the straps can tuck more material inward. My vest/cummerbund will hide this, so I have two options either way. I had to buy an XXL flightsuit, so I could sit, and talk in a normal voice. Now, I have to compensate for all the extra fabric.
7. Hmmm... some padding in the knee armor would add to the comfort level! Sorta cuts into the shin area. Ouch!
8. My armor pieces will need velcro anchoring onto the flightsuit. They kept sliding down while we were taking pictures. I am worried about the bicep armor sliding down off of the vest/cummerbund sleeve. I think once the chest armor is completed, and I get the t-strap system in place to attach the shoulders and the biceps together, it should work out.
I got the belt with the off-the-hip boxes hung and strapped in. Looks great!! Oh, yeah, the helmet worked out GREAT! I may need to put some anti-fog/shaving cream on the interior of the lens. great air circulation, and I could hear out of it extremely well. I'm still cyphering the audio hookups. I may have the speaker mounted into the chest after all. It's pretty close in there.
So without further hesitation:


I did find a few problems that need to be fixed:
1. I need a balacava that has better coverage for a longer neck. I didn't realize how much of a giraffe I have until I saw the photos. My wife was helping me out but still there's skin showing.
2. The collar has to be extended up to compensate for my neck, and a velcro sealing flap need to be installed. I will have to figure something to hide the zipper too. Giraffe neck syndrome. Any ideas to help out on this would be appreciated!!
3. I need to put elastic straps on the cuffs of the wrists to keep the sleeves from crawling out from my gloves.
4. Elastic straps on the pant cuffs wouldn't hurt either. They too tend to crawl out of my boots.
5. I have to remove some of the exterior pockets. I wanted to keep them some of them to keep my wallet and keys on my person, but the ones that show will be removed. The chest pockets I'm keeping because they will be hidden.
6. The waist area of the flightsuit is a little too baggy. Either I will have it sewn in, or add more velcro so that the straps can tuck more material inward. My vest/cummerbund will hide this, so I have two options either way. I had to buy an XXL flightsuit, so I could sit, and talk in a normal voice. Now, I have to compensate for all the extra fabric.

7. Hmmm... some padding in the knee armor would add to the comfort level! Sorta cuts into the shin area. Ouch!
8. My armor pieces will need velcro anchoring onto the flightsuit. They kept sliding down while we were taking pictures. I am worried about the bicep armor sliding down off of the vest/cummerbund sleeve. I think once the chest armor is completed, and I get the t-strap system in place to attach the shoulders and the biceps together, it should work out.
I got the belt with the off-the-hip boxes hung and strapped in. Looks great!! Oh, yeah, the helmet worked out GREAT! I may need to put some anti-fog/shaving cream on the interior of the lens. great air circulation, and I could hear out of it extremely well. I'm still cyphering the audio hookups. I may have the speaker mounted into the chest after all. It's pretty close in there.
So without further hesitation:
Retired from Star Wars Costuming - then again retirement is overrated


-
SHortTrooper
- Imperial Soldier
- Posts: 1152
- Joined: Wed May 02, 2007 8:08 pm
- Location: Ottawa,Il
-
Acrylikhan
- Imperial Soldier
- Posts: 442
- Joined: Fri May 26, 2006 7:21 pm
- Location: Chicago, IL
- Contact:


-
SHortTrooper
- Imperial Soldier
- Posts: 1152
- Joined: Wed May 02, 2007 8:08 pm
- Location: Ottawa,Il
-
Acrylikhan
- Imperial Soldier
- Posts: 442
- Joined: Fri May 26, 2006 7:21 pm
- Location: Chicago, IL
- Contact:
-
CloudStrife7
- 501st Member

- Posts: 161
- Joined: Mon Oct 02, 2006 4:22 pm
- 501st Legion ID: 7024
- Location: Madison WI
-
Acrylikhan
- Imperial Soldier
- Posts: 442
- Joined: Fri May 26, 2006 7:21 pm
- Location: Chicago, IL
- Contact:
-
Acrylikhan
- Imperial Soldier
- Posts: 442
- Joined: Fri May 26, 2006 7:21 pm
- Location: Chicago, IL
- Contact:
Been a bit busy lately, so I'm getting back on track. I've been devoting a lot of my time to the Phobos Project, which has a direct relationship to this project as depicted by the following algebraic expression:
P = (TB)x
Which, logically, could make the other expressions also true:
P = (TK)x
P = (TD)x
P = (TS)x
P = (TI)x
P = (IG)x
P = (TC)x
We'll explore those equations in later chapters in this course.
We received some new urethane foam at work, and I've been commissioned to see how good it will stand up to the rigors of vacuforming. Now... what to do? Since I've got the Holdout pistol, I think it is high time that I give the boot holster a try.

Stay tuned...
P = (TB)x
Which, logically, could make the other expressions also true:
P = (TK)x
P = (TD)x
P = (TS)x
P = (TI)x
P = (IG)x
P = (TC)x
We'll explore those equations in later chapters in this course.
We received some new urethane foam at work, and I've been commissioned to see how good it will stand up to the rigors of vacuforming. Now... what to do? Since I've got the Holdout pistol, I think it is high time that I give the boot holster a try.
Stay tuned...
Retired from Star Wars Costuming - then again retirement is overrated
-
Acrylikhan
- Imperial Soldier
- Posts: 442
- Joined: Fri May 26, 2006 7:21 pm
- Location: Chicago, IL
- Contact:
I've started some work on the boot holster. This will be a true test of my skills: getting the blaster to fit in the holster I'm going to make. I'll post some pictures of that very soon.
The Phobos Project has been taking most of my time. So here's some snapshots of my progress so far...

All 441 holes....


Forming Platen Construction - Complete.
Vacuum Test 1 - Tomorrow morning - 7:00 am
I'm hoping this will be a powerful as I think it will be. If not, I can take it a part and add some improvements.
The Phobos Project has been taking most of my time. So here's some snapshots of my progress so far...
All 441 holes....
Forming Platen Construction - Complete.
Vacuum Test 1 - Tomorrow morning - 7:00 am
I'm hoping this will be a powerful as I think it will be. If not, I can take it a part and add some improvements.
Retired from Star Wars Costuming - then again retirement is overrated
-
Targ
- Inactive Member
- Posts: 3001
- Joined: Mon May 26, 2003 5:24 pm
- 501st Legion ID: 3853
- Location: Forrest, Illinois
- Contact:
New Toys
You have the nicest toys. Is that Phobos or Forbin Project?

Served the Empire as Jolly Roger Squadron Detachment Leader 2005-2013
Now serves as Mentor, and Shadow Commander.
-
Acrylikhan
- Imperial Soldier
- Posts: 442
- Joined: Fri May 26, 2006 7:21 pm
- Location: Chicago, IL
- Contact:
-
SHortTrooper
- Imperial Soldier
- Posts: 1152
- Joined: Wed May 02, 2007 8:08 pm
- Location: Ottawa,Il
-
runnriottt
- 501st Member
- Posts: 91
- Joined: Wed Jan 10, 2007 9:01 am
- Location: From Danville Il, In Japan!